Initial Setup
Installation
Supercell Wx can be downloaded from GitHub. Download the latest release from https://github.com/dpaulat/supercell-wx/releases.
Windows Setup
Minimum requirements: Windows 10 (1809 or later), Windows 11
Once downloaded, unzip the application to its own folder, and launch supercell-wx.exe from the bin folder. No installation is required, and all dependencies are self-contained.
Note
Installation of the Microsoft Visual C++ Redistributable may be required, provided in the bin folder (vc_redist.x64.exe).
Linux Setup
Minimum requirements:
x64: Linux/X11 with support for GCC 11 and OpenGL 3.3 (e.g., Fedora 34+, Ubuntu 22.04+, EndeavourOS, openSUSE Tumbleweed)
arm64: Linux/X11 with with support for GCC 11, OpenGL 3.3 and GLIBC 2.38 (e.g., Fedora 39+, Ubuntu 24.04+, EndeavourOS, openSUSE Tumbleweed)
AppImage
The Linux AppImage is the preferred way to run Supercell Wx on Linux. It packages most required dependencies in order to run on a large number of modern Linux distributions without additional setup requirements.
To run the AppImage, download the appropriate file with the .AppImage extension, add executable permissions, and double-click the application or launch it from the command line.
Binary Release (tar.gz)
Supercell Wx uses Qt for its interface. The Qt libraries that Supercell Wx depend on are included in each release, but the Qt libraries may have additional dependencies that require manual installation.
In Fedora and Ubuntu, in addition to standard X11/XCB libraries, xcb-cursor must be installed. In openSUSE, a certificate workaround must be installed.
> dnf install xcb-util-cursor                # e.g., Fedora
> apt install libxcb-cursor0                 # e.g., Ubuntu
> zypper install ca-certificates-steamtricks # e.g., openSUSE
Once downloaded, untar the application to its own folder, and launch supercell-wx from the bin folder.
Arm Architecture Notes
Many Arm hardware devices do not have full OpenGL 3.3 support. If you experience issues running Supercell Wx (OpenGL errors, a blank map pane, strange artifacts, or crashing), you may need to set a few environment variables for rendering to work properly on your system.
# Explicitly enable rendering using OpenGL 3.3
MESA_GL_VERSION_OVERRIDE=3.3
MESA_GLSL_VERSION_OVERRIDE=330

# Force software rendering (only if the above doesn't work, has impact on performance)
LIBGL_ALWAYS_SOFTWARE=1
Setup Wizard
The first time the application is launched, a setup wizard will appear. Follow the instructions displayed on the screen to configure the application for first use.
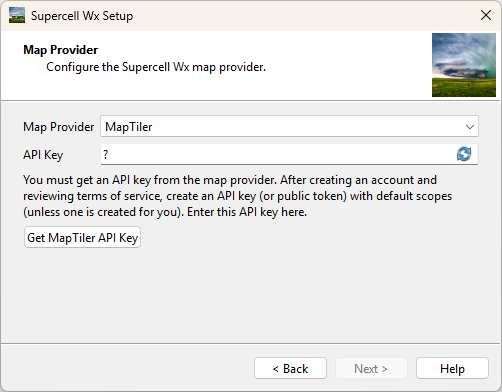
The Map Provider page displays first. Here, a map API key must be configured, using either MapTiler or Mapbox (specify the desired map provider). After creating an account and reviewing terms of service, create an API key (or public token) with default scopes (unless one is created for you). Click the button at the right side of the API Key input box to validate your API Key.
Note
Both MapTiler and Mapbox offer free tiers. At the time of writing, Mapbox requires a credit card for sign-up, while MapTiler does not.
Note
Future releases will add a basic map when no map source is configured.
Next, the Map Layout page displays. Here, the default display of a single map can be changed. The Map Layout can be configured as large as a 2x2 grid.

Configuration
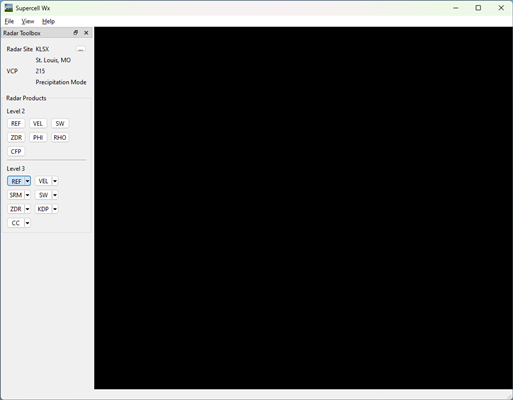
If no map API key has been entered, a black screen will appear in place of the map. An API key can be reconfigured in settings, following the API key instructions above.
Using the menu, navigate to the Settings window using File > Settings.
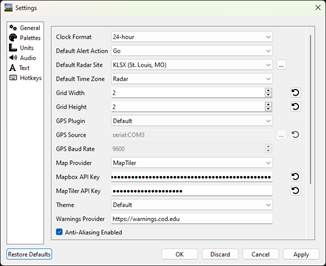
Additional options can be configured in the Settings dialog as desired. Once complete, press OK and restart the application.
Note
Most settings changes require a restart of the application to take effect. Future releases will improve this behavior.
Now that the application has been configured, it is ready for use.
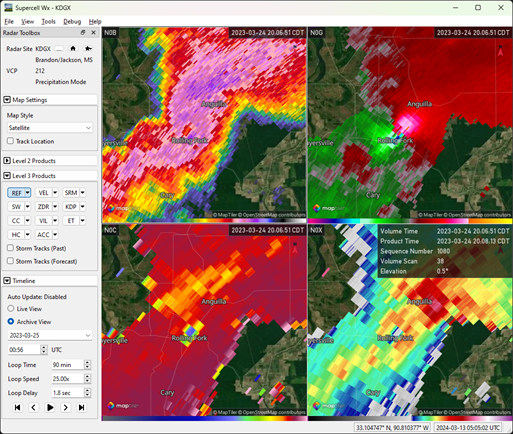
Map Controls
Supercell Wx uses MapLibre Native Qt to render a responsive map.
To pan the map, left-click and drag the mouse. To rotate the map, right-click
and drag the mouse. To reset the rotation to a north-up orientation, left-click
the compass icon in the upper right corner of the map. Use the mouse wheel to
zoom, or double click using the left or right mouse button to zoom in or out
respectively. Pressing z (configurable via hotkey settings) or both left and
right mouse buttons will cycle through map styles, including light, dark and
satellite underlays.
For more information about the displayed radar product, hover over the time in
the upper right of the map. Hold the SHIFT key to view radar moment data or
other derived information underneath the cursor. Hold the CTRL key to
display a tick marker on each map pane indicating the current mouse location.
Customization
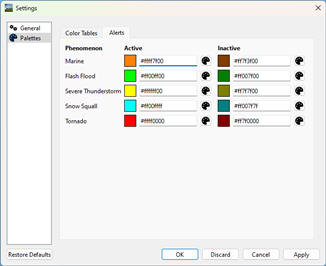
The map and radar display have multiple customization options, including color tables. The default color tables come from NOAA’s Weather and Climate Toolkit, but can be modified from the Palettes category in the Settings dialog. Color tables are compatible with the GRLevelX Color Table File Specification.
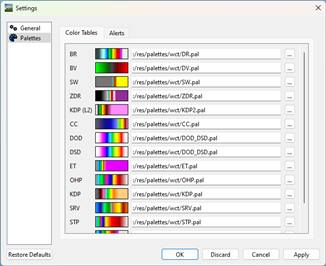
Additional color tables can be found at a number of sites, including:
https://grlevelxusers.com/grlevelx-goodies/categories/color-tables/
https://grx.almanydesigns.com/downloads/ (Color Table Format V3.0+ is not supported)
In addition to color tables, alert colors can also be modified. Use the text box to specify a color in ARGB hexadecimal format (#aarrggbb), or use the color picker to select a color.