Developer Setup
Required Tools
Compiler
Windows
Linux
GCC/G++ >= 11
Ninja (ninja-build) recommended
-
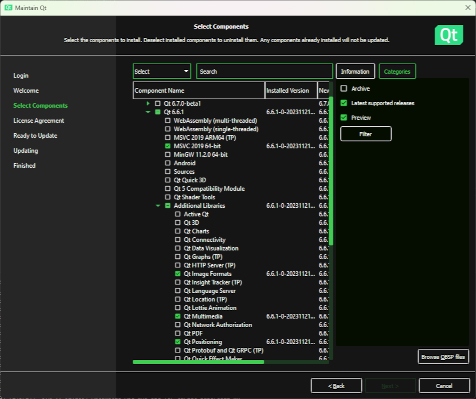
For Microsoft Visual Studio >= 2019, install Qt for MSVC 2019 64-bit
For Linux GCC, install Qt for Desktop gcc 64-bit
Additional libraries
Qt Image Formats
Qt Multimedia
Qt Positioning
See setup-* scripts for current version
Add the
bindirectory to your systemPATHvariable (e.g.,C:\Qt\6.6.1\msvc2019_64\bin)Alternate install via aqtinstall (installs to a versioned subdirectory within the current directory)
> pip install --upgrade aqtinstall
> aqt install-qt windows desktop 6.6.1 win64_msvc2019_64 -m qtimageformats qtmultimedia qtpositioning
> aqt install-qt linux desktop 6.6.1 gcc_64 -m qtimageformats qtmultimedia qtpositioning
See https://ddalcino.github.io/aqt-list-server/ for additional configurations
Recommended Tools
Integrated Development Environment
An IDE is strongly recommended to develop Supercell Wx. Microsoft Visual Studio is a good option on Windows, and Visual Studio Code is a good cross-platform option.
For Visual Studio Code, it is recommended to install the following extensions:
For remote development (e.g., Linux development on a Windows host), it is also recommended to install the following:
For UI development, it is recommended to run Qt Creator, installable via the Qt Maintenance Tool or aqtinstall. Alternatively, Qt Designer may be used as a lighter weight option.
Note
Qt Creator has had issues building the Supercell Wx project, with infinite recursion during CMake and Conan configuration, and is therefore only recommended for UI development. These issues may have since been resolved, but your mileage may vary.
Other IDEs are likely to work as well, however, the following have not been tested:
Git Tools
A visual tool for navigating the Git repository and submodules can be helpful, but is not required for development.
Initial Configuration
After cloning the repository from GitHub, initialize all submodules:
> git submodule update --init --recursive
It is recommended to run the initial CMake configure and generate steps via the
provided setup scripts. View the setup-{config}.{ext} contents, and make any
changes required for your environment, including desired build directory and Qt
path. Alternatively, you can let your IDE configure for you (e.g., Visual Studio
Code), although ensure you include the proper CMake variables (-D) when
configuring.
Note
CMake multi-config (i.e., single build directory for Debug and Release) is currently not supported. This is expected to be supported upon migration to Conan 2.x.
Using the default setup scripts, CMake will generate Visual Studio solution
files for Windows, and Ninja build files for Linux. To change this behavior, add
or modify the -G parameter with the appropriate CMake generator.
If configuring manually instead of using a provided setup script (e.g., with
Visual Studio Code on Windows), it is recommended to at least run
tools/setup-common.{ext}. This will ensure Python dependencies are setup
properly, as well as your conan profile.
When configuring on Linux, you may encounter an error due to missing packages
from your system. These may be installed manually, or you may update your conan
global configuration (~/.conan/global.conf):
tools.system.package_manager:mode = install
tools.system.package_manager:sudo = True
After installing missing packages, re-run the setup script.
Note
After updating compiler or Qt versions, you may need to update paths in your CMake cache. This may be done via your IDE, or by manually editing CMakeCache.txt located in your build directory.
Visual Studio
When CMake is run with the Visual Studio generator, your build directory will
contain a supercell-wx.sln file. Open this in Visual Studio, and proceed to
build the supercell-wx target.
Visual Studio Code
Open the supercell-wx source directory in Visual Studio Code. Open the Settings Window, and filter on CMake. In Workspace settings, set your Build Directory to your desired destination.

On the Primary Side Bar (left), select the CMake icon. Under Build, select the
appropriate Kit (compiler), and set your target to supercell-wx. You can proceed
to build supercell-wx using the Build button on the left side of the Status
Bar.
Guidelines
It is expected that developers will follow these guidelines. On occasion, there will be use cases for deviation from the guidelines below.
Don’t break existing functionality
Follow C++ best practices
Format files after making changes (most IDEs will respect the .clang-format file at the root of the repository)
Follow the Google C++ Style Guide
Keep Qt-dependent code in the
scwx-qtprojectIf adding a dependency, prefer adding it to conanfile.py over adding a submodule, unless additional customization is necessary
Minimize custom development environment configuration
Update acknowledgements when appropriate
Supercell Wx should remain MIT-licensed
Dependencies must be compatible with the MIT license
LGPL-licensed software must be contained within shared libraries
GPL-licensed software must not be used
Help
Stuck? You can look at https://github.com/dpaulat/supercell-wx/blob/develop/.github/workflows/ci.yml for hints, or join the Discord server for help.